Npf's blog

To content | To menu | To search

Monday, August 21 2023

Bash quirks

1/ Explain what the following bash code does?

set -e
i=0
while read line; do
  case $line in
    BLA_*)
      echo -n .
      ((++i))
    ;;
  esac    
  if [ $i -ge 80 ]; then
    echo
    i=0
  fi
done < file

2/ What does set -e?

3/ What else could improve the code quality?

4/ Why ++i rather than i++?

Wednesday, December 9 2015

A diskless Debian for ARM juno (ARM64 dev board)

Setting up a diskless Debian system for a cluster of ARM's Juno dev boards (ARM64)

Board setup for remote access

The board provides a mean of operating it remotely, somehow as one would expect of a server with a board management card (IPMI, Dell idrac, aso).

The board is indeed equiped with 2 serial lines: The first serial line gets the preboot command line, then the bootloader command line, and finally the Linux command line. As a result, once a Linux is booted, and if it happens to hang, we cannot use that serial line to operate a reboot. Fortunately, there is a way to configure the second serial line to take over the preboot command line, which allows to (hardware) reset or reboot the board at anytime.

For this setup, one needs to change the preboot configuration file:config.txt. We can access and modify the preboot files using 3 different means:

  1. connecting the usb-B female of the board to out computer, and mounting the mass storage device.
  2. connecting the RJ45 configuration port (ethernet) and FTP to the board (needs FTP activation from the preboot command line)
  3. opening the board case and extracting the microSD card from it's slot, then mounting it on our workstation.

Open config.txt and set MBLOG: UART1. While we are here, we can also change the HOSTNAME (cosmetic).

Debian nfsroot setup

We will setup a Debian nfsroot setup, so first of all, we need to configure a nfs server. As usual, we Install the nfs-kernel-server Debian package and setup the /etc/exports file as follows:

/srv/diskless/nfsroot 192.168.1.0/24(rw,no_subtree_check,secure,no_root_squash,async)

The juno board requires a recent Linux kernel (4.2.0 is ok), so we will use Debian unstable or testing. ARM64 is (most likely) a foreign architecture for our workstation (x86_64), so we use debootstrap in 2 stages:

workstatiom$ debootstrap --arch=ARM64 --foreign sid /src/diskless/nfsroot/debian-sid-arm64 http://ftp.fr.debian.org/debian

Then we boot the Linaro Linux provided with the Juno board (or use qemu-arm64) and mount the NFS directory from there. We can then run the second stage:

juno$ mount -t nfs 192.168.1.1:/srv/diskless/nfsroot/debian-sid-arm64 /mnt
juno$ chroot /mnt
juno(chroot)$ debootstrap --second-stage

We can now continue setting up the system within the chroot:

  • install the linux kernel, etc
  • configure network, etc

In order to enable the nfsroot boot, initramfs must be configured. We edit /etc/initramfs/initramfs.conf, and set:

MODULES=netboot
NFSROOT=auto

Then run update-initramfs -u.

I did not succeed getting the juno to boot with systemd, but sysvinit boots just fine. Fortunately, switching back to sysvinit is quite straight forward with Debian (Thanks Debian !):

juno(chroot)$ apt-get install sysv-rc sysvinit sysvinit-utils

Once finished, our Debian nfsroot system is ready.

Network boot setup

The board ships with UEFI as its boot loader (edk2). While it's possible to boot linux from UEFI, or to chain grub to get in friendlier hands, edk2 PXE seems to be badly broken (tftp issues) (actually I had a lot of issues with the board's UEFI...).

As a result, I found a nice workaround, switching to u-boot at the initial boot loader. Linaro indeed provides the 2 options, thanks to them! We use the juno-latest-busybox-uboot.zip package. (U-boot support seems actually to be newer than UEFI)

U-boot on juno supports dhcp and tftp boot, all we need. However, we have to change some bits in order to have the network boot triggered automatically upon poweron:

Since the default u-boot boot script is hard-coded in u-boot binary, we need to change it there. U-boot binary is stored as the SOFTWARE/fip.bin file in the preboot files (See above to access/modify them).

Use hexedit or the like to locate the bootcmd = ... string, and change it to bootcmd = dhcp ; source 0x90000000 ;.

End of the hard-core bits.

We now setup isc dhcpd for serving IP and boot filename to the board:

  host juno {
    next-server                     192.168.1.1;
    filename                        "boot.scr";
    hardware ethernet    00:02:F7:00:65:22;
    fixed-address        192.168.1.10;
    option host-name     "juno-1";
  }

And setup a tftpd server, and setup the remote boot script. Prefer atftpd to tftpd-hpa because the board's u-boot tftp client requires to disable the 'timeout' option (RFC2349): We use the --no-timeout option of atftpd.

Tftpd will serve kernel, initrd and boot script. Copy kernel and initrd from the nfsroot directory:

workstation$ cp /srv/diskless/debian-sid-arm64/boot/vmlinuz /srv/tftpboot/
workstation$ cp /srv/diskless/debian-sid-arm64/boot/initrd.img /srv/tftpboot/

Convert initrd.img to the u-boot format (not needed for vmlinuz...):

workstation$ mkimage -A arm64 -O linux -T ramdisk -C gzip -a 0x84000000 -e 0x84000000 -d initrd.img -n "initrd.img" u-initrd.img

Finally we create the boot script:

workstation$ cat <<EOF > /srv/tftpboot/boot.script
setenv kernel_name vmlinuz
setenv initrd_name u-initrd.img
setenv fdt_name juno/juno-r1.dtb
tftpboot ${kernel_addr} ${kernel_name}
tftpboot ${initrd_addr} ${initrd_name}
tftpboot ${fdt_addr} ${fdt_name}
setenv bootargs console=ttyAMA0,115200n8 root=/dev/nfs nfsroot=192.168.1.1:/srv/diskless/nfsroot/debian-sid-arm64 ro rootwait
booti ${kernel_addr} ${initrd_addr} ${fdt_addr}
EOF

And convert it to the u-boot format (boot.src file):

workstation$ mkimage -A arm64 -O linux -T script -C gzip -a 0x90000000 -e 0x90000000 -d boot.script -n "arm64-nfsroot" boot.scr

We are done, our juno should now be able to boot our Debian nfsroot system.

Setting up a cluster of diskless Juno

In order to boot a cluster of juno boards with a diskless OS, we need to setup a copy-on-write overlay so that every board has a dedicated root filesystem (/var). (One may consider having a different nfs export for every board, but that's not very elegant.)

For that purpose, we use Linux overlay fs (aufs is not supported with Debian 4.2.0 kernel) and squashfs (as of writing this, overlay fs support for nfs lower layer is broken. See Debian related bug which was closed and reopened in Aug 2015).

We'll describe that setup in a next post.

Enjoy.

References

  1. http://www.arm.com/products/tools/d...
  2. http://snapshots.linaro.org/member-...
  3. http://snapshots.linaro.org/member-...
  4. http://infocenter.arm.com/help/inde...
  5. https://www.linaro.org/blog/core-du...
  6. https://wiki.linaro.org/ARM/Juno/Fi...
  7. http://dflund.se/~triad/krad/junobo...
  8. https://www.debian.org/releases/sta...
  9. https://wiki.debian.org/Arm64Port
  10. https://wiki.tizen.org/wiki/Tizen_A...

Sunday, August 16 2015

Playing with an old Beagleboard...

Playing with old Linux embedded devices is not easy: First of all, old devices get forgotten and are not supported by new versions of software (e.g. kernel) once they are not the subject of concern of a critical mass of people. No long term support for hobbyist goodies... But worse than that, web sites or package repositories which are dedicated to those devices happen to vanish... I have to say it the case for several devices I own:

  • My Ipaq used to be the first hand-held device (PDA) supported by Linux (2001), but today there are few hopes to get the bits that made it working.
  • My N900 has no more available Debian repositories...
  • My Beagleboard has some interesting web sites that became dead ends.

Lets talk more about my Beagleboard (I might talk about my N900 in a future post). Hopefully, if some web pages (e.g. at angstrom linux) are dead, that are still a good support for the devices:

The following pages are the references for the Beagleboard. They are still the source of many information, but have more and more dead links:

The following google code pages are mostly outdated with dead links to some Angstrom Linux web pages. Anyway, they might still prove useful:

But hopefully, everything is there in the following pages to get even an old Beagleboard (rev c3) up and running with a recent kernel and a fresh Debian!:

Also some useful links regarding Nand and ubifs:

And now some rough notes of my testings:

mmc rescan
fatload mmc 0:1 ${loadaddr} uimage--3.14.25-r0.2-beagleboard-20150302185947.bin

ext4ls mmc 0:2 /home/root
ext4load mmc 0:2 ${loadaddr} /home/root/uImage-beagleboard.bin

ext2load mmc 0:2 ${loadaddr} /home/root/uImage-beagleboard.bin

ext4load mmc 0:2 ${loadaddr} /home/root/base-image-beagleboard.ubi
nandecc
mtdparts default
nand erase.part fs
nand write ${loadaddr} fs


nand read ${loadaddr} kernel

bootm start ${loadaddr}

---
U-Boot# ext4load mmc 0:2 ${loadaddr} /home/root/uImage-beagleboard.bin
4274232 bytes read in 349 ms (11.7 MiB/s)
U-Boot# bootm start ${loadaddr}
## Booting kernel from Legacy Image at 82000000 ...
   Image Name:   Linux-3.14.25
   Image Type:   ARM Linux Kernel Image (uncompressed)
   Data Size:    4274168 Bytes = 4.1 MiB
   Load Address: 80008000
   Entry Point:  80008000
   Verifying Checksum ... OK
---

mtdparts
mtdparts default
setenv nandroot 'ubi0:rootfs ubi.mtd=4,2048'
run nandargs
bootm

* Angstrom linux cmdline:
console=tty0 mpurate=auto buddy=unknown buddy2=unknown camera=none vram=12M omapfb.mode=dvi:640x480MR-16@60 omapdss.def_disp=dvi root=/dev/mmcblk0p2 ro rootfstype=ext3 rootwait


root@beagleboard:~# flash_eraseall /dev/mtd4
flash_eraseall has been replaced by `flash_erase <mtddev> 0 0`; please use it
Erasing 128 Kibyte @ 4040000 -- 25 % complete flash_erase: Skipping bad block at 04060000
Erasing 128 Kibyte @ f960000 -- 100 % complete 
root@beagleboard:~# ubiformat /dev/mtd4
mtd4    mtd4ro  

root@beagleboard:~# ubiformat /dev/mtd4 -s 512 -O 512
ubiformat: mtd4 (nand), size 261619712 bytes (249.5 MiB), 1996 eraseblocks of 131072 bytes (128.0 KiB), min. I/O size 2048 bytes
libscan: scanning eraseblock 1995 -- 100 % complete  
ubiformat: 1995 eraseblocks are supposedly empty
ubiformat: 1 bad eraseblocks found, numbers: 515
ubiformat: formatting eraseblock 1995 -- 100 % complete  
root@beagleboard:~# modprobe ubi   
root@beagleboard:~# modprobe ubifs
root@beagleboard:~# ubi
ubiattach     ubiformat     ubinize       ubirsvol      
ubicrc32      ubimkvol      ubirename     ubiupdatevol  
ubidetach     ubinfo        ubirmvol      

root@beagleboard:~# ubiattach /dev/ubi_ctrl -m 4 
[  310.406860] UBI: attaching mtd4 to ubi0
[  310.410919] UBI: physical eraseblock size:   131072 bytes (128 KiB)
[  310.417633] UBI: logical eraseblock size:    129024 bytes
[  310.423553] UBI: smallest flash I/O unit:    2048
[  310.428588] UBI: sub-page size:              512
[  310.433410] UBI: VID header offset:          512 (aligned 512)
[  310.439605] UBI: data offset:                2048
[  310.940551] UBI: max. sequence number:       0
[  310.962921] UBI: attached mtd4 to ubi0
[  310.966857] UBI: MTD device name:            "File System"
[  310.972747] UBI: MTD device size:            249 MiB
[  310.978240] UBI: number of good PEBs:        1995
[  310.983245] UBI: number of bad PEBs:         1
[  310.987915] UBI: number of corrupted PEBs:   0
[  310.992645] UBI: max. allowed volumes:       128
[  310.997467] UBI: wear-leveling threshold:    4096
[  311.002471] UBI: number of internal volumes: 1
[  311.007202] UBI: number of user volumes:     0
[  311.011840] UBI: available PEBs:             1972
[  311.016845] UBI: total number of reserved PEBs: 23
[  311.021850] UBI: number of PEBs reserved for bad PEB handling: 19
[  311.028320] UBI: max/mean erase counter: 0/0
[  311.032836] UBI: image sequence number:  1860044559
[  311.038085] UBI: background thread "ubi_bgt0d" started, PID 531
UBI device number 0, total 1995 LEBs (257402880 bytes, 245.5 MiB), available 1972 LEBs (254435328 bytes, 242.6 MiB), LEB size 129024 bytes (126.0 KiB)

root@beagleboard:~# ubimkvol /dev/ubi0 -N rootfs -m
Set volume size to 254435328
Volume ID 0, size 1972 LEBs (254435328 bytes, 242.6 MiB), LEB size 129024 bytes (126.0 KiB), dynamic, name "rootfs", alignment 1
root@beagleboard:~# mount -t ubifs ubi0:rootfs /mnt/
[  421.361236] UBIFS: default file-system created
[  421.422698] UBIFS: mounted UBI device 0, volume 0, name "rootfs"
[  421.429168] UBIFS: file system size:   252887040 bytes (246960 KiB, 241 MiB, 1960 LEBs)
[  421.437835] UBIFS: journal size:       12644352 bytes (12348 KiB, 12 MiB, 98 LEBs)
[  421.445831] UBIFS: media format:       w4/r0 (latest is w4/r0)
[  421.452026] UBIFS: default compressor: lzo
[  421.456329] UBIFS: reserved for root:  4952683 bytes (4836 KiB)


root@beagleboard:/mnt# xzcat /home/root/base-image-beagleboard.tar.xz | tar x^C
root@beagleboard:~# df -h
Filesystem                Size      Used Available Use% Mounted on
/dev/root                 3.3G    599.8M      2.5G  19% /
devtmpfs                113.1M         0    113.1M   0% /dev
tmpfs                   113.2M         0    113.2M   0% /dev/shm
tmpfs                   113.2M    316.0K    112.9M   0% /run
tmpfs                   113.2M         0    113.2M   0% /sys/fs/cgroup
tmpfs                   113.2M    316.0K    112.9M   0% /var/run
tmpfs                   113.2M    316.0K    112.9M   0% /var/lock
tmpfs                   113.2M         0    113.2M   0% /media
tmpfs                   113.2M      4.0K    113.2M   0% /tmp
ubi0:rootfs             226.1M     38.2M    183.3M  17% /mnt

Saturday, May 3 2014

A Git setup with a non-bare repository as origin

Forewords:

Our goal is to have a non-bare Git repository to work, on which we accept updates (git push) from cloned repositories while protecting the master branch (master branch is only to be updated locally, remote pushes comes to other branches, e.g. user named branches).

Setup:

First remote_repo is created (no bare). Then local_repo is cloned. The remote_repo's master branch can only be updated locally (e.g. not push from local_repo allowed). The local_repo user can create his my_user branch on local_repo. This my_user branch can be pushed from local_repo to remote_repo.

Workflow:

On the local_repo:

The user fetches changes from remote_repo. The user commit to his my_user branch on local_repo. The user merge from the master branch to his my_user branch on local_repo. The user push is my_user branch to the remote_repo.

On the remote_repo:

The my_user branch (formerly pushed from the local_repo) can be merged into the master branch Commits can also be made to the master branch.

Commands:

On local_repo:

git checkout my_user
git fetch origin
git fetch origin master:master
git merge master
git commit -a
git push origin

On remote_repo:

git chechout master
git merge my_user
git commit -a

Configurations:

On remote_repo:

Create .git/hooks/update:

+#!/bin/bash
+
+if [ "$1" == refs/heads/master ]; then
+  echo "error: remote update (push) to the master branch is not allowed" >&2
+  exit 1
+fi

(NB: also pushing to remote_repo's master branch is already prohibited as long as the master branch is checked-out on the repo.)

Also, to prevent any other user to push to a remote_repo's my_user branch, add to remote_repo's .git/hooks/update:

+BRANCH=${1##*/}
+if [ "$BRANCH" != "my_$USER" ]; then
+  echo "error: remote update (push) to branch $BRANCH is restricted to user ${BRANCH#my_} but you are $USER" >&2
+  exit 1
+fi

On local_repo:

Add to .git/config:

 [remote "origin"]
   fetch = +refs/heads/*:refs/remotes/origin/*
   url = /tmp/testgit/andra/
+  push = +refs/heads/my_user:refs/heads/my_user

Thursday, May 1 2014

Routing enigma

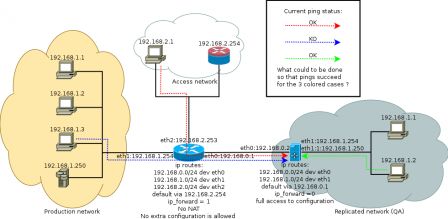
Enigma of the day:

adv_routing_enigma (click to see full size)

Answer wanted as GNU/Linux commands...


(download the drawing sources)

Thursday, March 20 2014

Wikipedia's list of Intel Xeon Processors

I'm regularly refering to Wikipedia's page: List of Intel Xeon microprocessors in my day to day's work, which I find a lot more useful than Intel's ark website.

However, I've always been surprised seeing prices showing up in the tables, wondering where they come from (and how relevant they could be).

Well, it's quite easy indeed... Just google for "Intel processors pricelist" and you should quickly end up on this page !

Tuesday, February 18 2014

Forced rollback of a remote branch of a Git repository

Forewords:

Once again today, I had to rollback the master branch of a remote Git repository to a previous state in a history. I mean deleting the last commits of the branch (not undoing them), so that they just do not appear neither in the content of the repository nor in the history of the branch.

Yes, this is very bad, but it's doable :-) . Just mind the fact that anyone who might have pulled into his local repository a state in between the current state and the state we want to revert to (excluded), will have to clone again the repository.
Do the trick

Send a mail

First of all, we send a mail to the other developers, so that they do not pull changes until you give them a go. Also you might inform them that they might receive a bunch of mails if they are subscribed to a commit notification mailing list due to our operations to come.

Delete the local master branch and watch your back

It's always good to take some guarantees when doing dirty things... In our case, the first thing is to backup a pointer to the current state of the branch, before deleting the branch. We actually do it by renaming the master branch instead of deleting it.

$ git checkout master
$ git branch -m master master.orig

Change origin's default branch

To be able to delete the master branch, it must not be the remote repository HEAD aka default branch. It often is however, so we first need to change that.

Before trying to change it, we need to make sure there is at least one other branch on the remote repository (otherwise, to what branch change the HEAD ?). We can push master.orig to origin for instance. We'll delete it once finished with the master one.

On GitHub, changing the default branch is just the matter of finding the good administration page: we go to the setting page, and the default branch combo-box input shows up. Switch to something else than master.

On a Git repository hosted on a server that we can ssh to, we can change the default branch (HEAD) by going to the repository's directory, and then use the git symbolic-ref command:

$ ssh git_server
git_server$ cd /path/to/the/directory/of/the/git/repository/ 
git_server$ git symbolic-ref HEAD
refs/heads/master
git_server$ git symbolic-ref HEAD refs/heads/master.orig

NB: We could also just modify the HEAD file in a bare repository, looks like it achieves the same goal.

Delete origin/master

Deleting the remote master branch is now just the matter of knowing the command... It uses to be:

$ git push origin :master

But actually, there is now quite an explicit command:

$ git push origin --delete master

Create the new local master branch

First of all we need to pick a commit hash reference, copy-pasting it from git log for instance. Then we check-out/create the branch:

$ git checkout 6fb1f9a16fd73bd0bdbf6defdb755186fa38a980 -b master

Push the new master branch to origin

As usual:

$ git push origin master

Clean-up our mess

We can now reset the default branch (HEAD) on origin, using the same method as above.

Then we can delete our backup temporary branches:

$ git branch -d master.orig
$ git push orig --delete master.orig

We are done ! :-)

Tuesday, April 16 2013

A very nice home router

Forewords

I am long time fan of OpenWRT and of Linksys router: wrt54gs (I own 3 of them :-) ). However, time goes and technogy changes: 100Mbps is not enough anymore. Furthermore, being limited to 5 ports, uplink included, suddenly becomed limiting: nowadays TV are connected, and even Home Theater systems are. I needed more ports.

One option would have been to add a dumb 1Gbps switch to my setup. But multiplying equipments does not please me. So I looked for an all-in-one solution.

The bright router

I found Mikrotik's Routerboard.

I actually bought a RB2011UiAS-2HnD-IN:

  • 5 x 1Gbps ports
  • 5 x 100Mbps ports
  • WiFi 802.11n
  • Linux based system (named RouterOS)
  • Full features routing capabilities
  • Support for virtual machines (named metarouter), and among them OpenWRT
  • Capability to change the system (and use OpenWRT) on the bare metal also
  • A not so useful but very nice small LCD screen :-)
  • 1 SFP port in case you gets FTTH and a "compatible" service provider (not tested)

My setup :-) : home network core

The dark side

  • One must notice that even if Linux based (which make understanding how the device works very handy), and very rich in term of features and administration interface, the software is closed sources. This becomes very annoying when one comes to setup a OpenWRT virtual machine on top of RouterOS: because it is closed sources, Mikrotik's metarouteur (mr-mips) is not an offcicial OpenWRT supported architecture. One must then rely on an unofficial OpenWRT distributions, and kernel has to stick to version 2.6.31.10, since no mr-mips patch exists for more recent kernel versions...
  • The router features a micro-USB host plug, allowing to connect a USB storage. Unfortunately, this storage cannot be attached to the metarouteur virtual machine (OpenWRT). To bad.

Conclusion

In the end, this device is sold for about 100€ (cheap !), made-in-EU (Mikrotik is a Latvian company), and is the only one I found on the market with more than 8 ports. So I definitively recommend buying it ;-) .

Update (2014-05-04)

There is now a patch OpenWRT Attitude Adjustment 12.09 Final, with Linux kernel 3.3.8 ! This make the last stable version of OpenWRT work out of the box as a MetaRouter ! See:

Thursday, August 25 2011

Playing with E16's window opacity (composite mode) and making it useful !

Forewords

Its been a long time since I started being a Enlightenment addict (year 2000 I think). And although I never moved to E17, I'm pretty happy to yet see new releases for the version I love: E16.

Indeed, E16 is still packaged in my favorite distro (Debian), is well integrated with Gnome (and is a excellent replacement for the very basic metacity). E16 even gets updates !

Today, I discovered the compiste mode or E16 ! which comes with a real opacity feature :-)

So what ? What can opacity bring of so much interest ? That's a really good question.

Indeed, speaking about cool window managers, I actually care about the efficiency one gives to me. So I'd agree with people promoting the self organizing one, doing auto tiling for instance (dwm, ion, xmonad for instance). However, I never really used one of them. Indeed I like to see my computer desktop organized just like my real desktop: stuffs laying everywhere, overlapping the one over the others but looked for and found in only the wink of an eye. E16 pager managing multiple areas is just the feature I was so happy to find years ago, and I couldn't loose, giving my the global picture of my never-mess :-) .

So what ? Opacity ? It's nice yes, but how is it really useful in my context ?

Today, my office-mate told me a truth: yes being able thanks to the opacity/transparency to see windows laying around under another can be useful to keep an eye on what's behind. No more Alt+Tab cycling of windows to find just one hidden below another. But imagine a program execution you're watching though the transparency of you front-most window and that you should suddenly absolutely stop, as an emergency ! Yeah Alt+Tab or the like allows you to raise a window, but what if there is plenty of them in the current area ! You end up raising windows the one after the others, and in the panic, you just miss the one ! So what ? Cycle again ?

Here is the truth of my friend: you need a way to instantly raise the window you see under your mouse pointer though the transparency of your current window !. If you do that I owe you a beer :-) . Badly no window manager he knew so far provides that... even E16.

No way. E16 can do it, thanks to its IPC feature. Eesh enters the play.

End of blabla, follows things you need to customize E16 to play nice with opacity,

Making it work

Obviously before anything please check that your hardware and X server provide the X11 composite extension (need a quite recent hardware). If not, hit the road jack... Then activate the composite mode in E16 setting, and set the opacity the the value you wish (obiously non 100% neither for the focused windows, nor the others). You're then all set for the following.

NB:

  • Please note that I use MOD4 as my favorite windows modifier/function key, which actually maps to the Windows key of my keyboard.
  • Also make sure you have your own version of the bindings.cfg configuration file in your ~/.e16/ by copying /etc/e16/bindings.cfg.

Part 1: raising windows laying below others under the mouse pointer

Part 1.1: cycle though the stack of window laying under your pointer

This one is pretty straigh forward... Too bad I started by solving the 1.2 problem :-) .

just add the following keybindings to your E16 setup by editing the ~/.e16/bindings.cfg config file and adding to the Aclass KEYBINDINGS global section the following line:

KeyDown    4      Tab wop * lower

then just restart E16

eesh restart

Hitting MOD4+Tab now will cycle the windows under your pointer, but only those ones, to the contrary of Alt+Tab that cycle all windows of the area.

Problem: once I've hit MOD4+Tab, how do I get my lowered window back to front (assuming I have more than 2 windows below my pointer)... argh !

Part 1.2: no I just want to swap the top 2 of 3 (or N) windows under the pointer

This part is covered by the script I actually wrote initially, before I found out that 1.1 already provided almost what I wanted. But not all what I wanted, ouf I did not loose my time :-) .

We need a script to list the stack of windows under the pointer, then we need to raise one of then, the 2nd, the 3rd or the Nth in the stack, our choice. I put this script in the file /home/npf/bin/e-zpick.sh (you can of course change the pathname as you like).

cat <<'EOF' > /home/npf/bin/e-zpick.sh
#!/bin/bash

Z=${1:-1}
POS=$(eesh "warp ?")
POS_XY=${POS#*: }
POS_X=${POS_XY% *}
POS_Y=${POS_XY#* }

for L in $(eesh "wl all" | tr " " "_" ); do
	T=${L:1:9}
	WIN_ID=${T##*_}
	T=${L:13:5}
	WIN_X=${T##*_}
	T=${L:19:5}
	WIN_Y=${T##*_}
	T=${L:25:4}
	WIN_W=${T##*_}
	T=${L:30:4}
	WIN_H=${T##*_}
	if [ $POS_X -ge $WIN_X -a $POS_X -le $((WIN_X + WIN_W)) -a $POS_Y -ge $WIN_Y -a $POS_Y -le $((WIN_Y + WIN_H)) ]; then
		echo $L
		WIN_ID_SEL[I++]=$WIN_ID
	fi
done
eesh "wop ${WIN_ID_SEL[Z]} focus"
EOF

Then we register the keybindings and mousebindings to use e-zpick.sh. Again edit the ~/.e16/bindings.cfg config file and adding to the Aclass KEYBINDINGS global section the following lines:

KeyDown    4        1 exec /home/npf/bin/e-zpick.sh 1
KeyDown    4        2 exec /home/npf/bin/e-zpick.sh 2
KeyDown    4        3 exec /home/npf/bin/e-zpick.sh 3
KeyDown    4        4 exec /home/npf/bin/e-zpick.sh 4

And to the Aclass BUTTONBINDINGS normal the following lines:

MouseDown      4 1 exec /home/npf/bin/e-zpick.sh 1
MouseDown      4 3 exec /home/npf/bin/e-zpick.sh 2

then just restart E16 again

eesh restart

Now:

  • Hitting MOD4+1 or MOD4 and clicking on the left mouse button will cycle top window with the one below
  • Hitting MOD4+2 or MOD4 and clicking on the right mouse button will cycle top window with the two below
  • Hitting MOD4+3 cycle top window with the three below
  • Hitting MOD4+4 cycle top window with the for below
  • five ? no, really ? help yourself.

Part 2: quickly changing the opacity of a window when transparency is boring

We now made the opacity/transparency feature useful, but we however know that it will from time to time be very annoying ;-) Here are some additionnal binding to overcome this (we hope)...

First, we want to be able to disable/enable the transparency using a keystroke. We add to the Aclass KEYBINDINGS global section in ~/.e16/bindings.cfg:

KeyDown    4        q wop * focused_opacity 100
KeyDown    4        a wop * focused_opacity 0
KeyDown   A4        q wop * opacity 100
KeyDown   A4        a wop * opacity 0

Second we also add mouse binding for the same purpose. We add to the Aclass BUTTONBINDINGS normal section in ~/.e16/bindings.cfg:

MouseDown      4 2 wop * focused_opacity 100 
MouseDouble    4 2 wop * focused_opacity 0 
MouseDown     A4 2 wop * opacity 100 
MouseDouble   A4 2 wop * opacity 0 
MouseDown      4 4 wop * focused_opacity -10 
MouseDown      4 5 wop * focused_opacity +10 

Finally restart E16.

eesh restart

Now:

  • Hitting MOD4+q or MOD4 and clicking on the mouse wheel will make the current window completely opaque when focused.
  • Hitting MOD4+a or MOD4 and double-clicking on the mouse wheel will revert to the default focused opacity setup for the window.
  • Hitting Alt+MOD4+q or Alt+MOD4 and clicking on the mouse wheel will make the current window completely opaque, when focused or not.
  • Hitting Alt+MOD4+a or Alt+MOD4 and double-clicking on the mouse wheel will revert to the default opacity setup for the window (focused or not).
  • Hitting MOD4 and rolling-up the mouse wheel will increase the opacity value from 0 (the default opacity) to 10%, and then up to 100%. Rolling-down of course do the reverse. (somebody told me MACOS X provides that... but that was no challenge ;-) )

Enjoy the beer :-) .

Tuesday, May 25 2010

Debian Squeeze & E16-Gnome vs gnome-panel-logout

how to replace `gnome-panel-logout' using `dbus-send' commands.

Continue reading...